file: ./content/docs/index.mdx
meta: {
"title": "🤔 Lee SRE",
"description": "A technical blog covering Linux administration, netcup hosting solutions, and open source deployment guides by an experienced SRE"
}
## Topics
* Linux Administration
* netcup Operations
* Open Source Software Deployment
## AI Analysis
If you want AI to analyze the content of this blog, you can use this [llms.txt](/docs/llms.txt) file.
## Disclosure Statement
This blog may contain affiliate links to various cloud service providers, but this will not affect the objectivity or fairness of the content. Although this blog uses the domain netcup.gifts, it is not owned by or affiliated with netcup GmbH.
## Feedback
For any questions or comments about the blog content, you can contact me at:
* Email: [lee@netcup.gifts](mailto:lee@netcup.gifts)
file: ./content/docs/netcup/the-most-affordable-netcup-server.mdx
meta: {
"title": "The most affordable netcup server",
"description": "Explore the most affordable server options from Netcup, featuring three budget-friendly models available on their German site. Learn how to navigate the purchase process and discover why these servers offer great value with minimal contract terms and varying billing periods"
}
Netcup offers three server models that are so affordable, they don't have an English version of the page.
However, you can find the models on the German page.
Click "In den Warenkorb"(add to cart) to add to the cart, then click "Zum Warenkorb"(go to cart) to go to the cart page.
From there, you can switch to the English page by clicking "en" in the top left corner
and proceed with your order as usual.
| | piko | nano | mikro |
| --------------------------- | ----------------------------------------------------------------------------- | ---------------------------------------------------------------------------- | ------------------------------------------------------------------------------ |
| **Model** | VPS piko G11s 12M | VPS nano G11s 6M | VPS mikro G11s 3M |
| **Billing Period** | 12m | 6m | 3m |
| **Minimum Contract Period** | 12m | 12m | 12m |
| **Price** | 0.84x12=10.08/year | 1.68x12 = 20.16/year | 3.36x12 = 40.32/year |
| **CPU** | 1 vCore | 2 vCore | 4 vCore |
| **RAM** | 1 GB | 2 GB | 4 GB |
| **Storage** | 30 GB | 60 GB | 120 GB |
| **Bandwidth** | 1 GBit/s | 1 GBit/s | 1 GBit/s |
| **Buy Link** | [Buy piko](https://www.netcup.com/de/server/vps/vps-piko-g11s-12m?ref=251135) | [Buy nano](https://www.netcup.com/de/server/vps/vps-nano-g11s-6m?ref=251135) | [Buy mikro](https://www.netcup.com/de/server/vps/vps-mikro-g11s-3m?ref=251135) |
* Bandwidth: If the average data traffic over the past 24 hours exceeds 100 MBit/s, a temporary throttling to 100 MBit/s will be applied.
All these servers have a minimum contract period of one year, but their billing periods vary.
## Why netcup servers are so cheap?
Netcup is a major hosting provider that was acquired by anexia, an Austrian company.
They generate revenue through high volume sales, with each individual product contributing only a small margin.
file: ./content/docs/open-source-alternatives/mintlify.mdx
meta: {
"title": "Mintlify",
"description": "Mintlify Open Source Alternatives"
}
import { GithubInfo } from 'fumadocs-ui/components/github-info';
import { DynamicCodeBlock } from 'fumadocs-ui/components/dynamic-codeblock';
import { Tabs, Tab } from 'fumadocs-ui/components/tabs';
## Fumadocs
Fumadocs is an open-source, self-hosted documentation platform that serves as a great alternative to Mintlify.
This document itself is written using Fumadocs.
It is based on Next.js and uses MDX for documentation.
With Fumadocs, you can easily deploy a standalone documentation site or add a `/docs` subdirectory to your existing website.
This article demonstrates how to add Fumadocs to the `/docs` subdirectory of your Next.js website.
Fumadocs UI documentation
## Installation
Suppose your website is `www.example.com, and you want to add a `[www.example.com/lee\`](http://www.example.com/lee`) directory.
You can easily run a Fumadocs site locally by following the Fumadocs documentation.
Detailed installation steps can be found in the [official Fumadocs documentation](https://fumadocs.vercel.app/docs/ui#automatic-installation).
## Setting Up a Subdirectory
For example, this site publishes the documentation system to the main site through the `/lee` subdirectory.
You can plan your desired subdirectory.
Then, set the `basePath` in the `next.config.mjs` file in the Fumadocs main directory:
```js
import { createMDX } from 'fumadocs-mdx/next';
const withMDX = createMDX();
/** @type {import('next').NextConfig} */
const config = {
reactStrictMode: true,
output: 'standalone',
basePath: '/lee'
};
export default withMDX(config);
```
At this point, you must access the documentation system via [http://127.0.0.1:3000/lee](http://127.0.0.1:3000/lee).
Once deployed remotely, you can access it via [https://sub.example.com/lee](https://sub.example.com/lee).
## Setting Up Reverse Proxy for Your Main Site: Rewriting in Next.js
[Next.js provides the `rewrites` configuration item](https://nextjs.org/docs/app/api-reference/config/next-config-js/rewrites#rewriting-to-an-external-url), which can be used to set up a reverse proxy for smooth upgrades.
In the main site's `next.config.mjs`, add rewrite rules:
```ts
module.exports = {
async rewrites() {
return [
{
source: '/lee',
destination: 'https://sub.example.com/lee',
},
{
source: '/lee/:path*',
destination: 'https://sub.example.com/lee/:path*',
}
]
},
}
```
This way, you can access the documentation system via [https://www.example.com/lee](https://www.example.com/lee).
If your main site has i18n settings, the middleware setup might prevent access to the documentation system.
In this case, modify the `matcher` settings in the `middleware.ts` of the main site to exclude it.
```typescript
export const config = {
matcher: [
// Match all pathnames except for
// - … if they start with `/api`, `/_next` or `/_vercel` or `/lee`
// - … the ones containing a dot (e.g. `favicon.ico`)
'/((?!api|lee|_next|up|_vercel|.*\\..*).*)',
]
};
```
## Deploying Next.js to a Remote Server
Besides deploying to Netlify or Vercel, you can also deploy to a remote server.
By using open-source alternatives, you don't have to worry about unexpected additional costs.
The cost of purchasing a server is fixed, and it offers great performance and ample storage space.
You can deploy not only web services but also databases, caching services, and more.
If you've purchased a server like netcup, you can deploy Next.js to the server.
We'll have a separate article discussing various deployment methods, such as:
* GitHub Actions for automatic deployment
* Kamal deployment
* Coolify deployment
* Dokku deployment
If you want to learn about other deployment methods, feel free to contact me!
file: ./content/docs/opensource/upic.mdx
meta: {
"title": "Upload images to Cloudflare R2 with uPic",
"description": "Upload images to Cloudflare R2 with uPic"
}
Since uPic hasn't been updated for several years, I decided to use uPic's custom uploader feature to implement custom upload interfaces in order to add other image hosting services.
You can easily add any image hosting service you want.
## Cloudflare R2
You can upload images to Cloudflare R2 via uPic, using your own domain name.
### Create New Bucket
1. Go to Cloudflare Dashboard
2. Click "R2 Object Storage" => "+Create bucket"
3. Set `Bucket name`, the other options can be left as default
4. Click "Create bucket"
5. Settings => Public access => Custom Domains
6. Click "Connect Domain" and set your domain, e.g., `img.example.com`
### Get Access Key
R2 Object Storage => "{} API" Button => "Use R2 with APIs" => "Create an API token"
Permissions Should be "Object Read & Write", and the others you could remain to default.
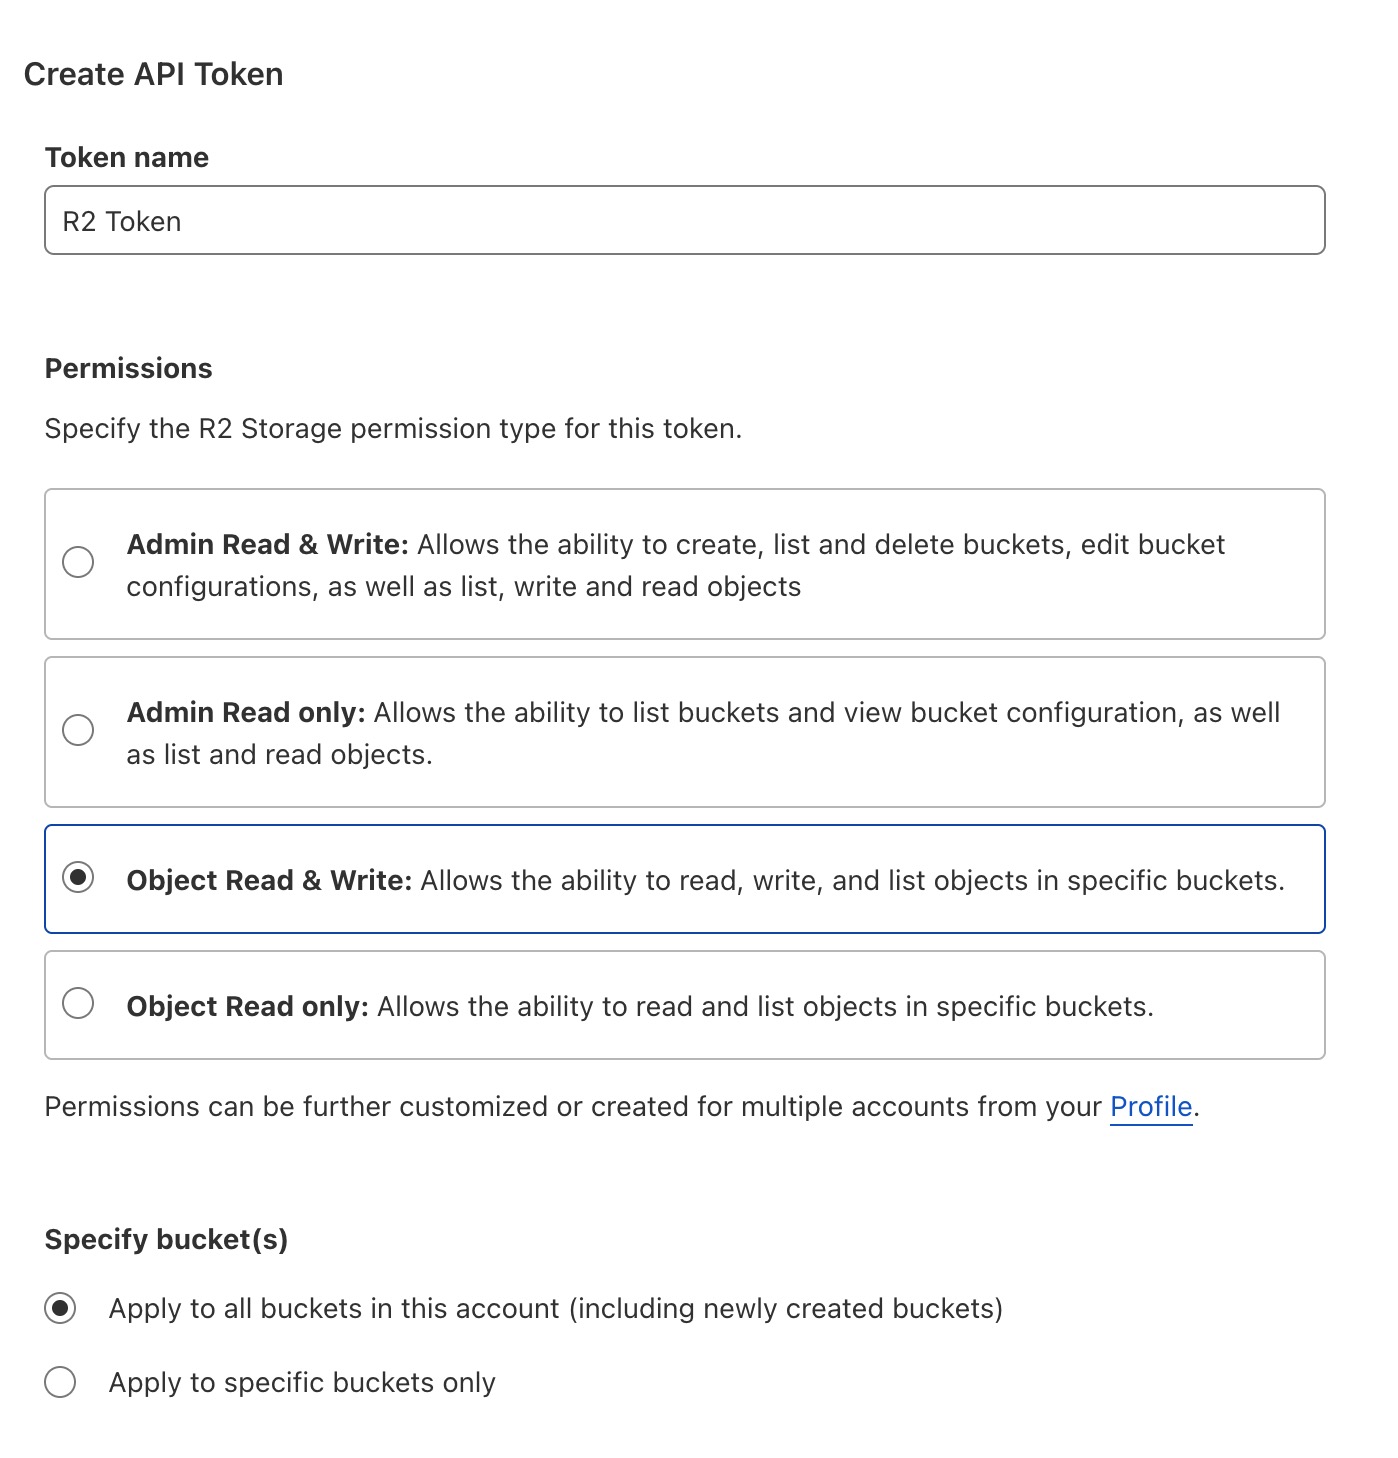
Copy the API Keys for the subsequent configuration.
* Access Key ID
* Secret Access Key
* Use jurisdiction-specific endpoints for S3 clients, typically `https://.r2.cloudflarestorage.com`
### Configure uPic
First Step: Add Custom Uploaders
* Preferences > Click "+" to add a Custom Uploaders
into uPic Custom Uploader Configuration.
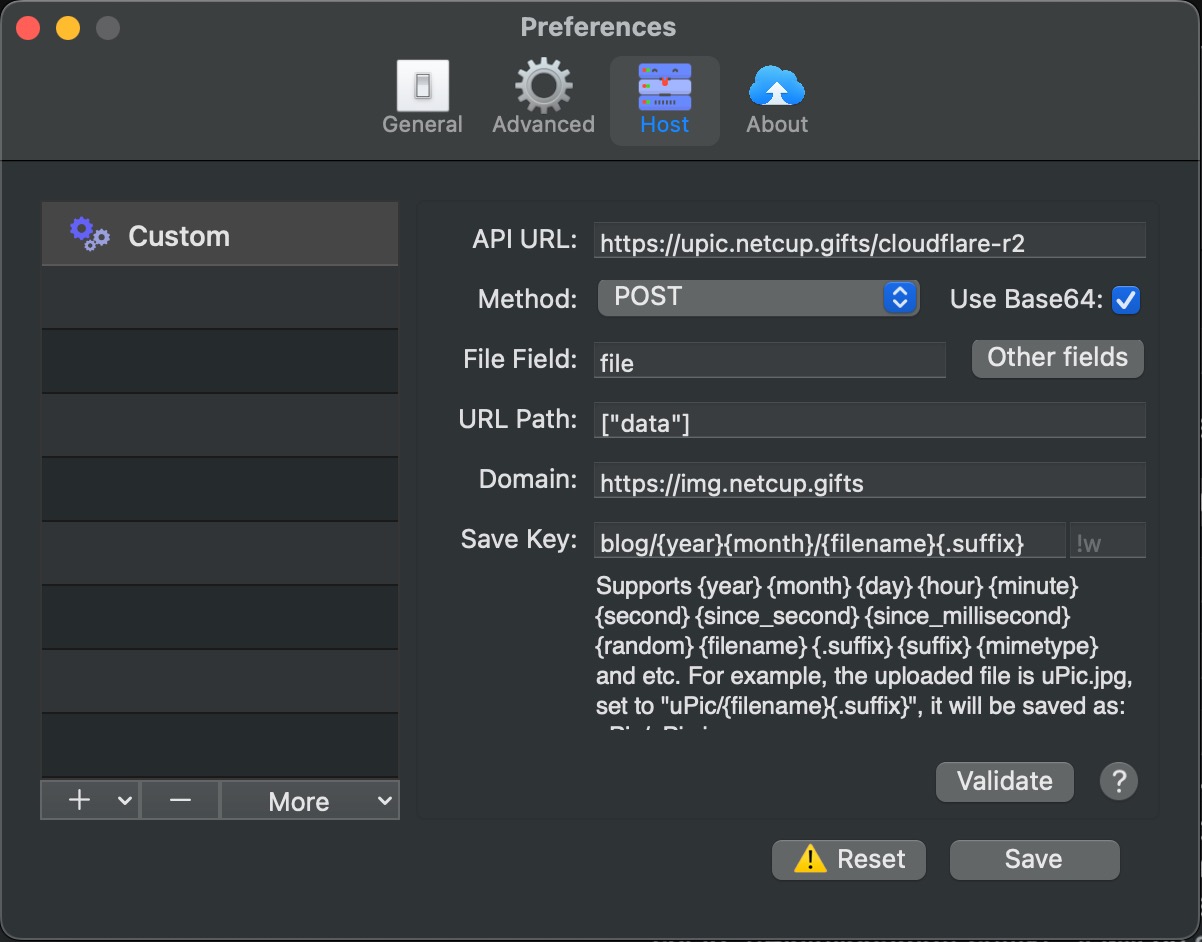
| Field | Value | Description |
| ---------- | ----------------------------------------- | ------------------------------------------------------------------ |
| API URL | `https://upic.netcup.gifts/cloudflare-r2` | API URL |
| File Field | `file` | |
| URL Path | `[data]` | |
| Domain | `https://img.example.com` | Your domain, starts with `https://` e.g.,`https://img.example.com` |
| Save Key | `blog/{year}{month}/{filename}{.suffix}` | The path you want to set |
Second Step: Add other fields
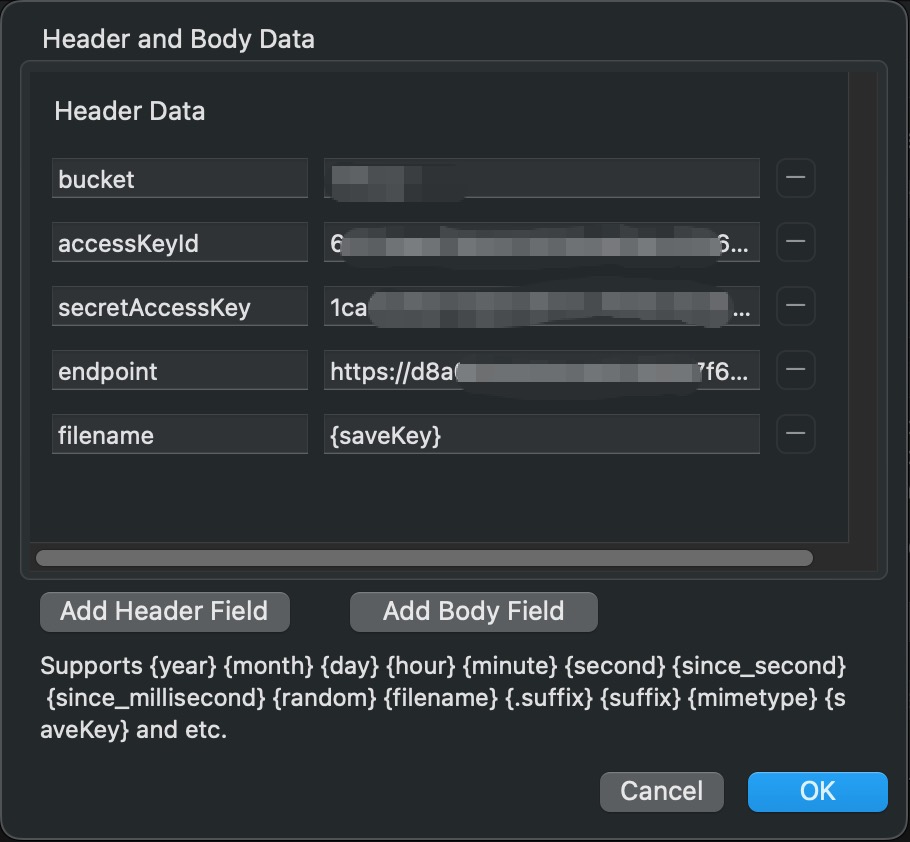
| Header Field | CloudFlare Name | Example Value |
| ----------------- | -------------------------------------------------- | ------------------------------------------------------------- |
| `bucket` | Bucket Name | `netcup` |
| `accessKeyId` | Access Key ID | `6713dae**********7b62ec` |
| `secretAccessKey` | Secret Access Key | `1ca5d39b***********bcc` |
| `endpoint` | Use jurisdiction-specific endpoints for S3 clients | `https://d8a6e1ec6********9c358e1eb.r2.cloudflarestorage.com` |
| `filename` | | `{saveKey}` |
Click Validate, and if configured correctly, you'll see a URL in your clipboard. When opened, it should display the uPic icon:
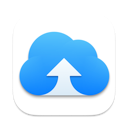
This means the configuration is successful! 🎉